Showing posts with label Pickle. Show all posts

Preserved Lemons over Salad

Having a well-stocked pantry and fridge can make or break the home cooking experience. Staple condiments provide comfort, and may bring sweetness, saltiness, sourness, brightness, or spiciness to an otherwise bland meal. Today's recipe is a pantry staple all over the world, and for good reason. Preserved lemons are easy to make and stretch the beloved lemon throughout the months which they are out of season.

The origins of preserved lemons date back to at least Roman times, but likely much earlier (Soyer, 110). They can be found in cuisines in the geographic span of Morocco to India. (Sonneman, 34) I most commonly associate the pickled citrus with North African stews and Moroccan tagine. North African food is vibrant with bold spices and colors; that is why ingredients like preserved lemons should be in every self-respecting home cook's repertoire.

So today we start preserving lemons! The unique fragrance of preserved lemons will add a distinct brightness to home cooked North African, Middle Eastern, or South East Asian dishes. Besides lemons, another citrus may be used in this pickling method. Limes, Grapefruit, and even oranges can be salted, cured, and allowed to ferment in their juices to extend their lifespan. Just like other pickles, spices may be added to preserved citrus to alter the flavor.


Preserved Lemons

Ingredients

  • Your preference Lemons
  • Box Coarse Kosher salt
  • Your preference Mason Jars
Cooking Directions
  1. Clean Mason jar(s), and allow to dry.
  2. Pour roughly 1 T of salt, or enough to create a layer into the bottom of the dry jar(s).
  3. Cut the tops off of all lemons, and quarter without cutting all the way through.
  4. Add a large pinch of salt in the center of the cut lemon and rub.
  5. Press down and allow some juice to come out. Give the jar a good shake and place in a dark area like a cupboard or drawer away from direct sunlight.
  6. After three days, remove and with a wooden spoon or other long-handled tool press the lemons to release the rest of their juices. If the leftover juice does not fully submerge, the lemons add fresh lemon juice on top.
  7. Place back in the same spot and allow the preserved lemons to ferment for one month.
  8. The preserved lemon rind also known as peel will be good to use indefinitely. Refrigerate and enjoy as needed.
Total Time: 1 month+

Citations and Further Readings:

  • Sonneman, Toby. Lemon: A Global History. London: Reaktion Books Ltd, 2012. Print.
  • Soyer, Alexis. The pantropheon, or, History of food, and it's preparation: From the Earliest Ages of the World. Boston: Ticknor, Reed, and Fields, 1853. Print. 
      Gimbap

      I love sushi. Most of my friends also love sushi, it is amazing that uncooked fish and vinegared rice have become such an important part of the modern culinary landscape of America. However, if you are like me, making quality sushi at home is a fairly unobtainable prospect, still I still want what I want. I am not a master sushi chef, nor do I have an expansive Japanese pantry or access to the highest quality fresh fish. That being said, not all is lost, Korea's gimbap also called kimbap is an evolution of maki sushi, and it is much friendlier to the home cook. In fact, I consider gimbap incredibly valuable as an option to break from the monotony of packed lunch sandwiches. Gimbap has its own practiced traditions and serving establishments, for all practical purposes you can fill gimbap with pretty much anything you have on hand.

      Essentially, gimbap is a Korean cross between omaki(sushi rolls) and a sandwich. While maki is generally filled with raw fish and served with soy sauce, pickled ginger, and wasabi. Gimbap can be filled with either raw or cooked ingredients. Bulgogi and sauteed spinach gimbap, Why not? Hot dog and American cheese gimbap, probably shouldn't, but you could! The filling combinations are endless, just make sure to remove excess moisture so gimbap stay's dry. (Ha, 25)

      If you apply a local and seasonal philosophy to what you stuff in your gimbap, you are most likely going to be successful. The rice in gimbap can either be seasoned or left plain, and if you choose the latter, the ingredients will really speak for themselves. If you want to create the classic gimbap, the standard dollar gimbap known as Wonjo Kimbap is filled with spam( Mary Eats).

      *Today's post is a little different in that I provide the instructions on cooking and rolling the rice, yet I do not instruct on what filling you should use. You may follow my lead, but I suggest making your own gimbap creations with you have available.
      Gimbap


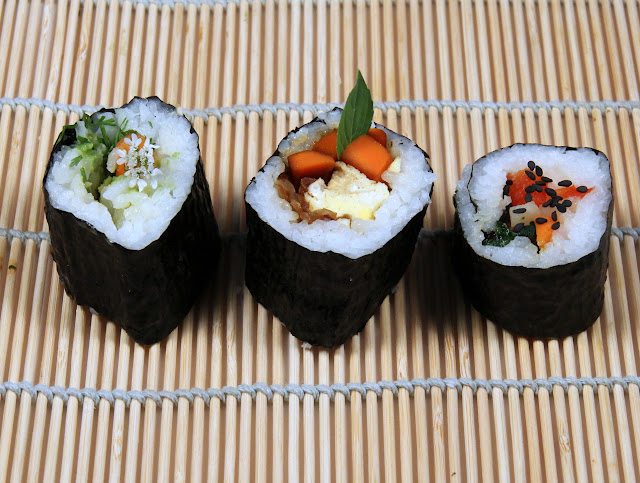
      Gimbap with Various Fillings


      Ingredients
      • 2 c Sushi (short grained) rice
      • 2 & 1/4 c Water
      • Nori (dried seaweed)
      • Rice Seasoning
      • 2 T Rice wine vinegar
      • 1 t Mirin
      • 3/4 t Sugar
      • 1/2 t Kosher Salt
      Additional Equipment:
      Electric rice cooker
      Bamboo rolling mat

      Cooking Directions
      1. Wash rice of any dust until water runs clear, then add to rice cooker.
      2. Add 2 1/4 c water and cook in the rice cooker until finished.
      3. Add rice wine vinegar, mirin, sugar, and salt. Fluff gently and let cool down until just warm.
      4. On top of a bamboo rolling mat add nori, cooked rice, and then your fillings.
      5. Roll, cut into segments (I do segments of 6), and store in a refrigerator until ready to use.
      6. Remember to remove excess moisture so that the gimbap stays dry.

        Fillings:

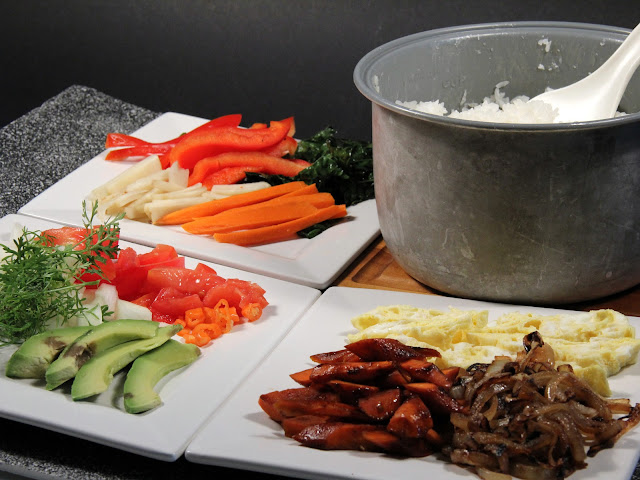
        (Sweet and Savory Gimbap) Molasses & Red Miso Roasted Carrot, Egg, & Caramelized Onion
        (Guac Gimbap) Avocado, Onion, Chili, Cilantro, Tomato
        (California Gimbap) Pickled Sunchoke, Bell Pepper, Julienned Carrot, Sauteed Kale,
      Total Time: 30 min
      Citations and Further Readings:
      • Ha, Christine. Recipes From my Home Kitchen. N.p.: Rodale, 2013. 25. Print.
      • Kang, Grace. "How to Make Kimbap." Serious Eats. Serious Eats, 23 July 2009. Web.
      • "Kimbap Nara Menu." Mary Eats. N.p., 16 Nov. 2006. Web. 
      Pickled Ramps Stalks over Ramp Leaf

      Ramps are awesome little wild onions with nice green leafs that grow native to the Appalachian and outer Appalachian regions of North America. The excellent thing is, vigilant foragers can find them throughout woods all over the United States in April. They are “native to the eastern North American Mountains. They can be found growing in patches in rich, moist, deciduous forests and bottoms from as far north as Canada, west to Missouri and Minnesota, and south to North Carolina and Tennessee.” (Greenfield and Davis)

      Ramps are a true treat, not just because of the mild yet sweet taste, but because it signifies spring and the beginning of fresh flavorful food from locals farmers markets. In fact, in recent years ramps have become a major food craze. In 2010 James Beard award winning author wrote an article in Time magazine called ‘For Foodies, Ramps Are the New Arugula’. Trend or not, ramps are simply a small joyful ingredient only available for a short period during the year.

      I pickled a pound of ramps I bought at the farmer’s market so that I could enjoy the treat throughout the year and even into July. These pickles are great on a charcuterie plate, cheese plate or loaded on a ham sandwich. Spring is always welcome after a Midwestern winter, and keeping ramps around a little longer so if you see some ramps at your farmers market give them a try.

      Pickled Ramps

      1 Pound of Ramps
      Pickling Brine
      ¾ c Apple Cider Vinegar
      ½ C Rice Wine Vinegar
      1 C Water
      1 T Kosher Salt
      1 T Cane Sugar
      ½ t Cumin Seed
      ½ t brown mustard seed
      1/8 t dill seed
      1 bayleaf
      1 t Crushed pepper
      8 peppercorn

      1. Clean ramps; wash in cold water several times until all dirt particles are gone. Cut off leafy top and reserve for other use.
      2. Combine all ingredients in the pickle liquid in a pot and bring to a boil. Turn off heat and add ramps to liquid.
      3. Once the heat has rendered the ramp stocks soft and malleable. Carefully pack the ramps in a sanitized mason jar.
      4. Pour the liquid over ramps.
      5. Let the pickles come to room temperature.
      6. Store in the refrigerator for up to several months depending on how much of the green leaf you left on.

      Yield: 1 Pint
      Total Time: 15 minutes 

      Citations and Further Readings:

      • Greenfield, Jackie, and Jeanine M. Davis. "CULTIVATION OF RAMPS (Allium tricoccum and A. burdickii)." North Carolina Cooperative Extension Service. NC State University, n.d. Web. 15 June 2014.
      • Ozersky, Josh. "For Foodies, Ramps Are the New Arugula." Time. Time, 13 Apr. 2010. Web. 15 June 2014.