Showing posts with label Pork. Show all posts


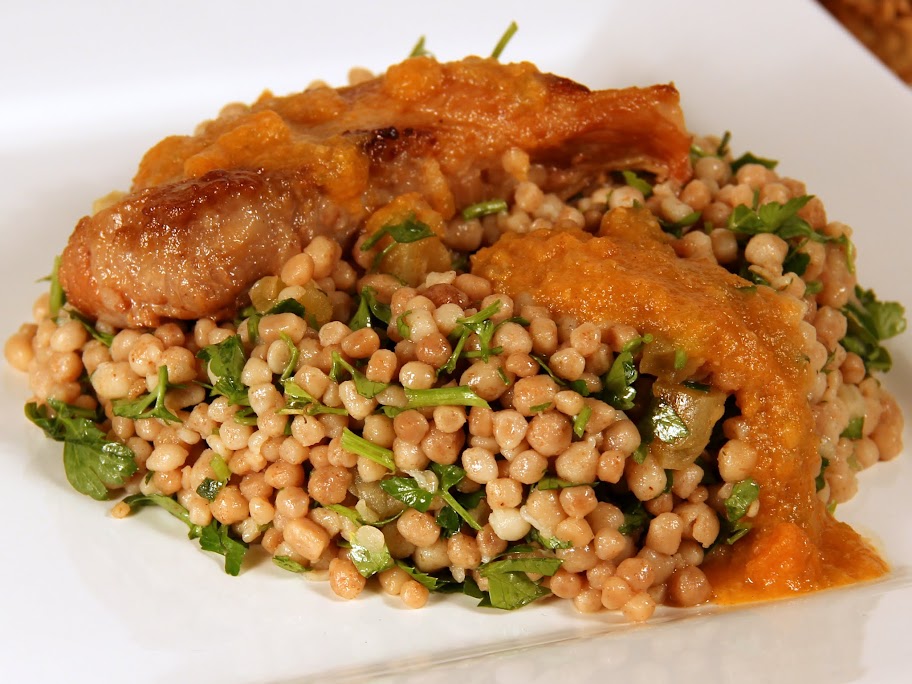
Braised Pork Jowl with Persimmon Gravy
Pork jowl, also known as pork cheek is one of my favorite cuts of pork. When jowl is braised over a long period the meat becomes "melt in your mouth" tender. Pork cheek is both chock full of fat and collagen, so it needs to be cooked low and slow for best results. Think of past experiences with cuts of meat like oxtail, ham hock, and shoulder.

Pork cheek is popular across the world, I have seen it atop a bowl of ramen as Chashu, cooked in a Sichuan style, and cured as the Italian Guanciale. Pork cheek shares many similarities with pork belly, and I have found that it is a wonderful substitution in many cases. One of the best arguments I can make about using pork cheek is the comparable cost per pound. As pork belly has risen in popularity, so has its price. Pork cheek is less expensive than pork belly, I bought mine from a higher priced butcher store and still paid under 5 dollars for a pound.

This dish may appear somewhat exotic, but it was meant to be a homey dish to enjoy during the cold winter months. Stews, soups, and other braises are perfect for this time of year and perfume homes with their irresistible scents. Like many braises, this dish will take over three hours to prepare, so I suggest planning ahead, embracing the smells, and enjoy the lengthy process.


Braised Pork Jowl with Persimmon Gravy

Ingredients

  • 2 Fuya persimmons
  • 2 c White wine
  • 1 pound Pork cheek
  • 4 Garlic cloves
  • 2 Red shallots
  • 1 Stalk of celery
  • 1 T sugar
  •  
    Cooking Directions
    1. Trim the fat off of 1/2 to 1 pound of pork cheek until the majority of its fat is removed, then salt.
    2. Heat up an enamel coated dutch oven or another pan with plenty of high heat oil.
    3. Brown all sides of the pork cheek and set aside discard leftover oil.
    4. Add roughly 1 T of butter into the Dutch oven or whatever pan you are using and over medium heat brown shallots, celery, and garlic.
    5. Once browned, deglaze with 2 c of dry white wine, scrape the residual fond.
    6. Place the browned pork cheek back in with the wine mixture, and add two skinless Fuyu persimmons.
    7. Cover Dutch oven with a tight-fitting lid and cook in a 250F oven for 3 hours, if you are not using a Dutch oven, transfer everything to a lidded oven safe pot or other braising cookware.
    8. Once again remove the pork cheeks from the Dutch oven and set aside.
    9. Transfer the braising liquid into a blender and blend until smooth, transfer back to the Dutch oven. Add 1 T of sugar and adjust seasonings if necessary, and reduce on the stove top over medium-high heat. 
    10. Once thickened to a gravy-like consistency remove from the heat.
    11. Serve pork cheek with a side dish(es), and top with persimmon gravy.
    Total Time: 3 Hours 30 min
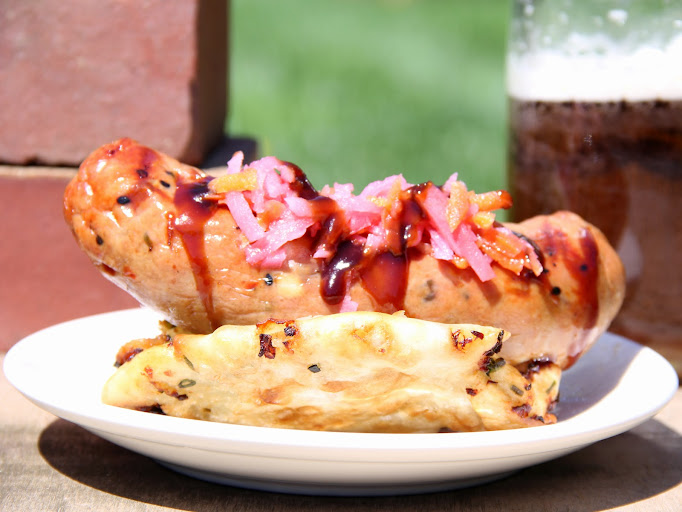
    Ramp and Miso Sausage
    *Served in a fresh shrimp and scallion pancake with pickled daikon/carrot, Hoisin sauce.

    After some time of tinkering around with fresh sausages I finally came up with a recipe that I believe is both unique and delicious enough to warrant a Joy and Feast post. I have become extremely interested in the sausage making process and I wanted to show that it's fairly simple to make out of this world sausages on your own, which are designed suite your own tastes or dietary needs.

    I might be an overly enthusiastic advocate of the sausage making process, but the moment you are able to serve your own sausages to friends and family is an incredibly gratifying experience. In addition, after reading the listed ingredients on the back of most inexpensive sausages should turn anyone away from accepting anything but the best quality sausages. Mass produced commercial sausages are filled with preservatives and additives which I believe no one needs in their diet.

    What defines a sausage? Sausages have been an important aspect in the human diet for a very long time. Sausage Obsession cited the earliest sausage usage can be traced back to 50,000 B.C.E. Traditionally sausages were scraps of meat or other ingredients stuffed into the offal, generally the intestine or stomach of a recent kill in order to preserve and use as much of the animal as possible. Practicing sausage making allows modern women and men to have the opportunity to practice a tradition that dates back tens of thousands of years.

    The concept of the sausage has spread all across the world in which a huge variety of traditions and practices have arisen. Some of the regional variations have very interesting ingredients and processing techniques to transform the sausage into an edible treat. By this I mean that sausages can be raw and stuffed into a casing then cooked, pressed into patties and cooked, fermented, smoked, and even air-dried(McGee 170) until enough moisture leaves the sausage that it becomes a hardened and edible. Sausage can be the fillings of potstickers and raviolis, crumbled onto pizza, and even a delicate emulsified mixture of meat, egg, and cream. The bottom line is sausage making is important, so why not make fresh stuffed sausages at home?

    As varied as the techniques and ingredients are in the realm of sausage making, one of the sage pieces of advice Michael Ruhlman offers is keep a 3 to 1 ratio of meat to fat. or keep a sausage at least 25% fat by weight(p 130), ignore this advice, and the result is a dry sausage, and there is no point in investing several hours on homemade sausages if the result is destined to be inadequate. The addition of liquid's and fruits or vegetables with a high moisture content may add to the succulence of the final product.

    The ingredients which sets this particular sausage apart are the miso and ramp. Miso is a fermented soybean paste exalted in Japanese cooking, miso is considered one of Japan's most important staples (Tsuji, 76). There are several varieties of miso, but for the this sausage we need to use a stronger and saltier variety like most red misos. The other unique ingredient in this sausage is the ramp. Ramp's are wild onions which grow throughout the Appalachian chain in the early spring, The greens and stems both have wonderful and separate uses. However, for practicalities sake feel free to substitute fresh ramps with scallions if you are making this in any other season. For another Joy and Feast recipe using ramps check out one my earliest recipes for Pickled Ramps.


    If you have any unique sausage recipes or enlighten sausage techniques of your own, please let me hear back!
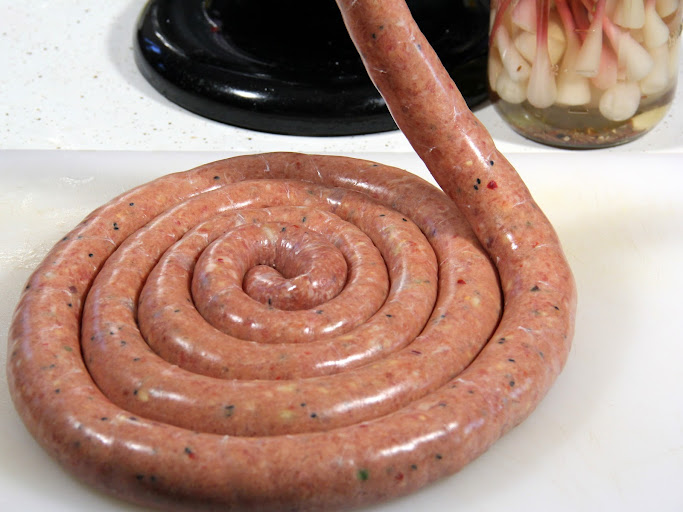
    Ramp and Miso Sausage


    Ramp and Miso Sausage


    Ingredients
    • 4 pounds Boneless pork shoulder
    • 1 pound Boneless & skinless chicken breast
    • 8 Ramps, minced, substitute scallions if ramps are out of season
    • 2 Large eggs
    • 3 T Red miso
    • 3 T Ginger, minced
    • 2 T Garlic, minced
    • 2 T Dried chili flakes
    • 2 T Kosher salt
    • 6 T Soy sauce
    • 2 t Sugar (preferably Dextrose)
    • 1 & 1/2 t Sesame seeds
    • 10 feet Hog casings(can substitute lamb casings, or use as dumpling filling).

      Special Equipment:
      A stand mixer with a meat grinder and sausage stuffer attachment.
    Cooking Directions
    1. Make sure all equipment is sterilized and chilled before starting the sausage making process.
    2. Trim any sinew, tough cartilage, skin, or bones, and then dice meat into medium chunks.
    3. Feed all of the meat into your stand mixer with the meat grinder attachment.
    4. Feed directly into stand mixer's mixing bowl. Add all ingredients and quickly mix thoroughly with stand mixer's paddle attachment.
    5. Heat up a portion of the meat mixture in a skillet and ensure that the seasoning is correct, if not adjust at this point until satisfied.
    6. Attach sausage stuffer onto the stand mixer. Feed the whole casing onto the sausage stuffer and tie the end.
    7. Feed mixture through the stand mixer until sausage is stuffed.
    8. Make individual links by twisting the sausages towards oneself, then away in an alternating pattern.
    9. Let the sausages sit in the refrigerator for at least one hour.
    10. Fire up your grill or skillet and cook through to an internal temperature of 165F. I also vacuum seal and freeze unused sausages, they last for months and maintain their quality.
    Total Time: 4 hours

    Further Readings and Citations:
    • McGee, Harold. On food and cooking: the science and lore of the kitchen. Simon and Schuster, 2007.
    • Ruhlman, Michael. Ratio: The Simple Codes Behind the Craft of Everyday Cooking. Simon and Schuster, 2009.
    • "The History of Sausage." Sausageobsession.com
    • Tsuji, Shizuo. Japanese cooking: a simple art. Kodansha International, 2006.

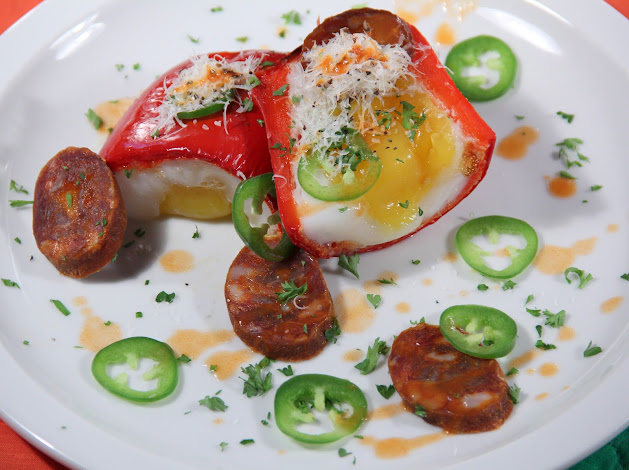
    Baked Goose Egg and Red Pepper with Chorizo

    This week's recipe was such a blast to develop and photograph. I was gifted three beautiful geese eggs from my friend. As a proponent of actual free range chicken eggs, these three geese eggs made the quality control cut. These geese have lived a happy life feeding on what nature provides, as well as produce scraps, a healthy diet generates richer and uniquely satisfying eggs. Eggs are marvels of nature, they are essentially maternal gifts of protection and nutrition to their offspring. Eggs provide birds, reptiles, amphibians, and fish with fats and proteins as well as other nutrients in order to develop into larger animals. With such a huge variety of eggs to take advantage of why do American's primarily only invest in chicken eggs, when there are delicious alternatives like geese eggs available? I believe that is a complex question with a variety of economic, agricultural, cultural, and environmental factors. However, if more Americans opened their minds to geese eggs as a food source, they would be in for a treat.

    Geese, like chickens chickens will lay eggs regardless of fertilization. This means by not eating unfertilized geese eggs we are doing a disservice to ourselves, unfertilized geese eggs will eventually rot and completely go to waste if unused. Geese eggs are primarily considered a spring delicacy, there is only a fairly short window to enjoy the large eggs. In North America, geese primarily lay eggs from as early as mid-February to late May.(USDA, 1) In addition to the limited window for egg production, mother geese are notoriously aggressive for protecting their eggs, both fertilized and unfertilized. (Shoot) This is another big turnoff to potential egg producers, also known as farmers.

    There are many wonderful applications for geese eggs including baking, poaching, cooking in a precise water bath, frying, pretty much any way you would use a chicken egg. There were countless options for recipe development, but I thought it would be fun to go in a mostly Spanish route. The inclusion of the the Spanish chorizo really helps elevate the dish and set it apart from your regular old bell pepper baked goose egg.

    Spanish chorizo should not be replaced in this recipe with Mexican chorizo. Spanish chorizo is a hog casing stuffed, cured, fermented, and dried style of sausage, similar to pepperoni in technique. Mexican chorizo has different spices and is either free-formed ground pork or stuffed into a casing, but must be cooked. I will demonstrate different styles of sausages and techniques in future Joy and Feast posts, but for now I will only suggest to try finding the best Spanish chorizo available in your area. Pretty much any American charcuterie practitioner worth buying from will offers a Spanish style chorizo.
    Baked Goose Egg and Red Pepper with Chorizo

    Stuffed Bell Pepper with Baked Goose Egg, Spanish Chorizo, and Chilies

    Ingredients
    • 1 Goose egg
    • 1 Large red bell pepper
    • Slices Premium Spanish chorizo
    • 1 Jalapeno, thinly sliced
    • Parsley, minced fine
    • Romano cheese (Parmesan), grated
    • Tabasco sauce
    • salt and pepper to taste
    Cooking Directions
    1. Preheat oven to 350F
    2. Cut open the bell pepper and remove the seed pod, any remaining seeds, and the leftover white membrane.
    3. Rub the outside skin of the bell pepper with olive oil or organic canola oil.
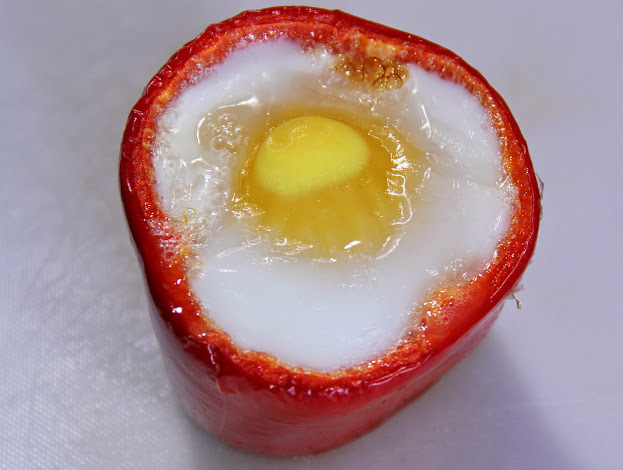
    4. Gently crack the goose egg and fill the bell pepper cavity.
    5. Place the egg-filled pepper in a cast iron pan or an oven proof dish, then bake between 35-50 minutes. The duration of cooking will depend on several factors including egg size and elevation, check at 35 minutes and remove when it is done. Remove the pan when the egg white and yolk are completely set.
    6. Slice the egg filled pepper in half with a very sharp knife.
    7. Plate the pepper and dress with chorizo, jalapeno, parsley, Tabasco, salt, pepper, and Romano cheese on top. The quantities should suite your needs, an omission of chorizo makes this dish vegetarian.
    Total Time: 1 hour
    Citations and Further Readings:
    • "Canada Goose." Wildlife Services. USDA, Aug. 2009. Web. <http://www.aphis.usda.gov/wildlife_damage/downloads/canada_goose.pdf>.
    • McGee, Harold. On food and cooking: the science and lore of the kitchen. Simon and Schuster, 2007.
    • Shoot, Brittany. "Farmers Take a Gander at Goose Eggs." Modern Farmer. N.p., 17 Apr. 2014. Web. <http://modernfarmer.com/2014/04/farmers-take-gander-goose-eggs/>.
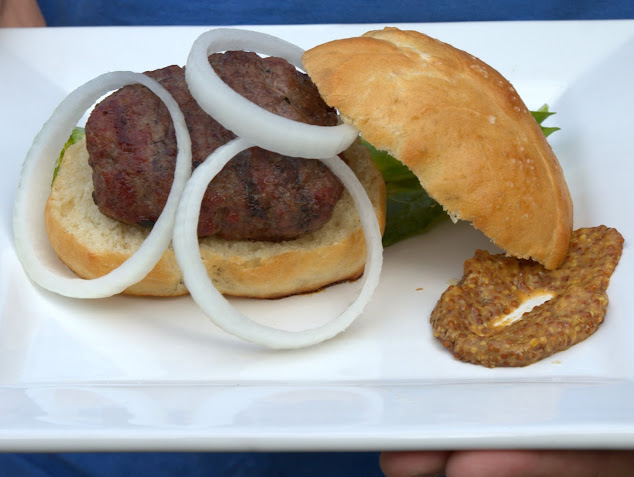
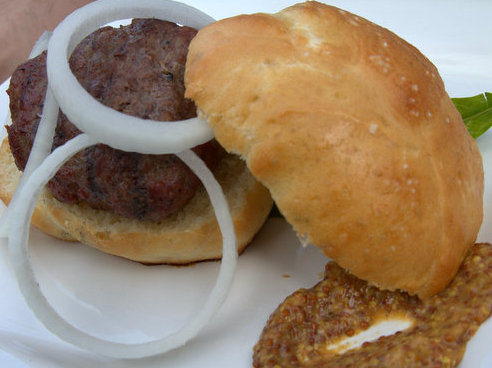
    Coburger Brautwurst Burger Grilling out is a favorite summer past time of mine, The smells, sounds, beer, and music are all some of my favorite aspects of the summer. This recipe combines two of my favorite Outdoor grilled foods and merges them into one.

    I fell in love with bratwurst during the one month stay I had in Germany during December 2013. I learned that there is a variance and tradition to Bratwurst all over Germany. Everything from the type of meat to spices are subject to change from region to region. A beautiful mixed meat Bratwurst comes out of Coburger in the Bavaria region.

    To explore more of the history of Coburger's style of bratwurst I turned to German Food Guide's article. “There is a long standing dispute over the exact origin of the Coburger Bratwurst. One story dates the bratwurst to "Fat Tuesday" (Fastnacht) in the year 1498, in which two bratwurst were given to the poor and children of Coburg. Another story says that the bratwurst was first created in the year 1530, when it was prepared for Martin Luther and various elected officials, who were journeying through the city of Coburg. In 1827, the bratwurst was mentioned in a letter from the composer Karl Friedrich Zelter to his friend Johann Wolfgang von Goethe: "Since 6:00am, I have watched from my hotel window bratwurst being grilled over 10 different fires, so if this letter smells like grilled bratwurst, you know where it comes from. I've been told that over 10,000 bratwurst are grilled in the two market days every week here - that means every soul in Coburg gets one bratwurst per week." (German Food Guide)

    Coburg Germany’s version of the bratwurst is made with at least 15% beef or veal, and uses lemon zest, nutmeg, salt, pepper and egg as a binder. Also “In Germany, the Coburger Bratwurst is grilled over a pine-cone fire.” (German Food Guide) Our version of the Coburger Bratwurst Burger is % 66 ground pork and %33 80/20 beef. We do away with the egg, because the salt helps the proteins bond “When you salt meat and knead it, proteins in the meat become soluble. That soluble protein gels when the meatball is cooked, binding it firmly together.” (Arnold) In addition, I replaced smoking pine cones with mesquite wood chips, the familiar wood used in an agressive backyard smokey flavor.

    Slow grilling with mesquite smoke


    Coburger Bratwurst Burgers

    Ingredients
    • 1/2 pound Ground beef
    • 1 pound Ground pork
    • 1 T Nutmeg
    • 1 T Kosher salt
    • 1 T Ground black pepper
    • 2 t Lemon zest
    • Wood chips to smoke
    Cooking Directions
    1. Mix beef, pork, and seasonings in a large bowl, then let mixture sit for 1 hour covered in refrigerator.
    2. Weigh out patties into 6 quarter pound patties.
    3. Set up the wood chips in aluminum foil, place over direct heat of the grill and wait until it starts to smoke.
    4. Place patties on a grill above the smoke packet and cook until internal temperature is 165, the process should take roughly 30 minutes, but always check the temperature of your burgers with a sterile instant read thermometer.
    Total Time: 1 hour 30 min
    Citations and Further Readings:

    • "Coburger Bratwurst ." German Food Guide, n.d. Web. 14 Aug. 2014. <http://www.germanfoodguide.com/wurstdetail.cfm?wurst_number=7>.
    • Arnold, Dave. "Dave Arnold on Meat Glue-Meatballs and Gluten-Free Cooking." Eater. Eater, 3 June 2011. Web. 14 Aug. 2014. <http://eater.com/archives/2011/06/03/ask-dave-arnold.php>.
    Photos by Jordan Henline